Using Power & Battery Management
Inverters
One of the most useful items to put on a boat would be an inverter. Inverters make 110 volt AC power from 12 volt battery system. Put simply, for every 100 watts of AC power that inverter is producing, it needs to draw about 10 amps from the 12 volt battery system - (for inverters rated at 90% efficiency, the number is closer to 9.25 amps per 100 watts).
Appliance // Watts // Use Time // Watt Hours // Amp Hours
Sat Receiver // 20 // say 6 hrs. // 120 // 12
Computer // 70 // say 6 hrs. // 420 // 6
12 V lights // 6A* // say 3 hrs. // 18 // 6
IDEAS
Install a small digital panel meter and permanently connect it to batteries?
Change lighting to LEDs?
Solar panels?
RULES
Start out with fully charged batteries.
Turn off lights when not need them. (Pay attention to those things that draw power and shut them down when not actually using them).
Watch the battery meter and get a feel for how healthy the batteries are.
If possible, recharge batteries before they get down to 50% of capacity, as this will extend their life.
Pay attention to the batteries.
Maintenance and proper selection pay off in long life.
Provide for adequate charging and monitoring.
Don't just "plug it in and forget it".
Battery Management:
Unplugged from shore power every amp that systems take out of the battery bank is going to have to be put back somehow, sometime. This is especially true on a small yacht like SY Cryptic. Weight and space restrictions dictated a battery bank of two "Domestics" and one for the "Starter Motor".
A. Power consumption of Cryptic's electrical items:
- Speed/Distance log
- Echo-sounder
- Navigation lights (having LEDs fitted*)
- Anchor lights (having LEDs fitted*)
* can switch between the two.
- Interior lights,
- Sat Nav. (Garmin)
- Auto Tiller
(Key is how many Watts (or Amps) each consumed (in the appliance or in its Handbook ... or get a figure for Amps, and multiply this by 12 volts, to convert it to Watts). Useful formulae
. Watts = Amps x Volts
. Amps = Watts / Volts
. Volts = Watts / Amps
For example, if an item consumes 2.4 watts per hour and is rated 12V it consumes 2.4/12 - or 0.2 amps per hour (0.2Ah).
(B) Battery management
Marine batteries are apparently designed for deep discharge cycles, - i.e. be repeatedly discharged and recharged over quite a long lifespan. However most commentators say that there is a limit, though, beyond which draining a deep discharge battery is unhealthy for it - say discharging below 50% of nominal capacity will shorten the life of a marine battery to an extent, and going below 70% is "no-no".
If the 50% limit is followed a modern marine battery should be able to withstand several thousand cycles of discharge and recharging. Go for the largest capacity battery (re. 50% of its capacity before needing to recharge it), then at the discharge rates described above could likely survive a good deal more than six hours, day or night, without bothering to recharge.
(C) Recharging
Leave the marine with a full battery – so fit decent shore power link and a good battery charger. Charging out at sea - engine only. Remember too, that at night the drain will be far worse so need to run the engine for some hours by dusk to build up any kind of reserve to get through the night.
Some facts and useful information about Batteries
1. Batteries are never 100% efficient - energy is lost (heat as well as chemical reaction) in both charging and discharging. Use 1,000 watts from a battery, it might take 1,200 watts or more to fully recharge it.
2. Slower charging and discharging rates are more efficient.
3. The starting battery needs a very large starting current for a very short time - so have a large number of thin plates for maximum surface area. The plates are composed of a lead "sponge", similar in appearance to a very fine foam sponge. This gives a very large surface area, but if deep cycled, this sponge will quickly be damaged and will fall to the bottom of the cells.
4. Deep cycle batteries are designed to be discharged down as much as 80% repeatedly, and have much thicker plates often solid Lead plates.
5. Marine batteries are actually "hybrid", and fall between the starting and deep-cycle batteries, while a few are true deep cycle. In the hybrid, the plates may be composed of Lead sponge, but it is coarser and heavier than that used in starting batteries. It is often hard to tell what you are getting in a "marine" battery, but most are a hybrid. "Hybrid" types should not be discharged more than 50%.
6. A battery's capacity for storing energy is rated in a number of ways but most often in Amp/Hours.
7. Amp/Hour rating of battery capacity is calculated by multiplying the current (in amperes) by time (in hours) the current is drawn. For example: A battery which can deliver 4 amperes for 20 hours before being discharged would have a 80 amp-hour battery rating (4 X 20= 80).
8. Selecting the correct batteries is all about lifespan.... the correct ones will last a lot longer, - but the lifespan will vary considerably with how the battery is used, // maintained and charged, as well as temperature, and other things ... typically Marine: will last 1-6 years.
Remember
Reversing the polarity of the battery when connecting it may severely damage or destroy some parts of electrical system.
Actions
1. Mark the cables so which is which is obvious.
2. When replacing batteries, remove the negative cable first because this will minimize the possibility of shorting the battery when removing the other cable.
3. Next remove the positive cable and then the hold-down bracket or clamp. If the hold down bracket is severely corroded, replace it.
4. Dispose the old battery by exchanging it when buying the new one.
5. Be sure that the battery tray and cable terminals or connectors are clean.
6. Thinly coat the terminals and terminal clamps with Vaseline to prevent corrosion.
7. Replace the hold-down brackets or straps to secure the batteries in place.
8. Reconnect the cables in reverse order, i.e., attach the positive cable first and then the negative cable last.
9. Before using the batteries check the electrolyte levels and state-of-charge & refill or recharge as required.
Cautions:
- Make sure the battery compartment is vented for batteries.
- Never place batteries where electrical sparks or other ignition sources may exist - for example a simple 12 volt light with a switch on it is an excellent source of ignition spark!
- Secure batteries with straps or brackets to prevent movement
- Most premature failures are caused by low electrolyte levels.
- Electrolyte is is lost whenever the batteries are charged OR discharged heavily.
- Keep the electrolyte level above the plates at all times - adding only distilled water
- In summer, check the electrolyte levels more frequently.
- Check the tightening of belts and also the hold-down clamps and terminals.
Extend the battery's life by keeping it charged properly and avoiding deep discharges. A battery "cycle" is one complete discharge and recharge cycle. It is usually considered to be discharging from 100% to some point not lower than 20%, and then charging back up to 100%. Battery life is directly related to how deep the battery is cycled each time. If a battery is discharged to only 50% each cycle, it will last about twice as long as if it is cycled to 20%. Running the battery down totally flat will have a very negative effect on the lifespan of the battery. Avoid discharging the battery below the 40% level whenever possible. If the battery has been charging, then it's important to let the battery set for 2 to 3 hours without a load or charger connected to stabilize before testing. Otherwise, the reading will be high, caused by a phenomenon called "surface charge."
It is also necessary to invest in a good digital voltmeter.... it's the only meter that will offer the necessary accuracy to properly test your battery system.
Most ratings assume that the battery is at room temperature: 21 degrees C. As the temperature of the battery drops, so will the fully-charged voltage reading - it seems to be safe to say that for each 4 degrees C drop in temperature expect to see the voltage drop about a tenth of a volt. (.10 volt) That means that a battery at 0 degrees C d with a no-load voltage reading of 12.35 volts is fully charged. Battery capacity (how many amp-hours it can hold) is reduced as temperature goes down, and increased as temperature goes up. This is why a car battery dies on a cold winter morning, even though it worked fine the previous afternoon. At freezing, the battery's capacity is reduced by 20%. At approximately -27 C battery AH capacity drops to 50%. Capacity is increased at higher temperatures - at 122 degrees F, battery capacity would be about 12% higher. But - even though battery capacity at high temperatures is higher, battery life is shortened. Battery capacity is reduced by 50% at -27 degrees C - but battery LIFE increases by about 60%. Recharge a deep cycle battery as soon as possible after each use. It is very hard on a deep cycle battery to sit for extended periods in a partially charged state.
Charging batteriesMost flooded batteries should be charged at no more than the "C/10" rate for any sustained period. "C/10" is the battery capacity in amp/hours divided by 10. For a 220 AH battery, this would equal 22 Amps. Charging at 15.5 volts will give you a 100% charge on Lead-Acid batteries. Note that flooded batteries MUST bubble (gas) somewhat to ensure a full charge, and to mix the electrolyte. Float voltage for Lead-Acid batteries should be about 2.15 to 2.23 volts per cell, or about 12.9-13.4 volts for a 12 volt battery. Flooded battery life can be extended if an equalizing charge is applied every 10 to 40 days. This is a charge that is about 10% higher than normal full charge voltage, and is applied for about 2 to 16 hours. This makes sure that all the cells are equally charged, and the gas bubbles mix the electrolyte. If the liquid in standard wet cells is not mixed, the electrolyte becomes "stratified". You can have very strong solution at the top, and very weak at the bottom of the cell.
"What does all that mean?" It means that battery charging is a little more complicated than most people think. It's not really safe to assume that running the engine will keep batteries up to par, or that plugging in to A/C power and letting the converter run will do it; (in fact this is often referred to as a maintenance or trickle charge, since it's main purpose is to keep an already charged battery from discharging).
Converters vs. real battery chargersAs stated above, the converter isn't designed to be a decent battery charger. It's main purpose in life is to provide 12 volt power while you are plugged in to an A/C outlet. Since the converter is designed to not exceed a voltage of about 13.5 volts, it will never fully charge batteries. Also, after it has succeeded in partially charging it will then commence to boil off electrolyte, as the "float" voltage is too high. If the boat is plugged into A/C power for months at a time, MUST keep a close eye on battery's electrolyte level. It is very common for a converter to boil a battery dry in a month or two.
It is a big help to unplug the converter or switch it off when the boat is not in use // attached to A/C power. Just run the converter overnight once a month or so and it will be much easier on the batteries. Another significant disadvantage to the converter is that most units aren't capable of delivering their rated amperage to the batteries to charge them. Older converters will only manage about 10 or 15 amps and will put out significantly less when powered by a generator. A much better choice is to replace the converter with a modern 3 stage battery charger. These units are fully automatic and can be left plugged in continuously without damaging the batteries. They provide much higher charging current than a converter and will fully charge the batteries in short order, even on generator power.
Testing the batteries
1. Visually inspect for obvious problems.... for example; damaged cases, corroded terminals or cables, loose hold-down clamps or cable terminals, or low electrolyte.
2. To insure accurate readings, you must eliminate any surface charge before testing. Use one of the following methods;
1. Allow the battery to sit for six hours with no load or charger connected, or...
2. Apply a 25 amp load for three minutes and wait five minutes, or...
3. With a battery load tester, apply a 150 amp load for 10-15 seconds.
3. The battery under test must be disconnected from any load or charger when testing. This is referred to as "Open Circuit".
Check both the specific gravity in each cell with a external hydrometer AND the battery terminal voltage with a digital voltmeter without the engine or converter/charger running. If the state-of-charge is BELOW 75% using either the specific gravity or voltage test then the battery needs to be recharged BEFORE proceeding.
Replace the battery, if one or more of the following conditions occur:
If there is a .050 or more difference in the specific gravity reading between the highest and lowest cell, you have a weak or dead cell(s),
If the battery will not recharge to a 75% or more state-of-charge level.
If digital voltmeter connected to the battery terminals indicates 0 volts, you have an open cell, or if the digital voltmeter indicates
10.45 to 10.65 volts (5.2 to 5.35 volts for a 6 volt battery), you have a shorted cell. [A shorted cell is caused by plates touching, sediment build-up or "treeing" between plates.
Winter Storage - Most boats should be stored in the winter months on the hard. This storage can be very tough on batteries. Batteries in storage self-discharge over time. This is a natural phenomenon and will cause batteries to slowly go flat. Deep discharges drastically shortens battery life. Extremely cold temperatures can cause batteries to freeze if they aren't adequately charged. Some charging current will have to be applied to the batteries periodically during the storage period. To keep batteries safe through the winter storage period, consider removing the batteries and storing then in a warmer place, like a garage. Check the voltage once a month and do an overnight recharge if the voltage falls to the 80% state-of-charge point. If removing the batteries just isn't possible, then there are several things that should be done as the boat goes into storage.
Ensure that ALL electrical loads are disconnected from the batteries. There are lots of things that might put a tiny load on the batteries even though everything is "off". Most smoke, CO and Propane detectors all are tiny drains on the batteries. Even if the current draw is only a few Milli-amps, over time these "phantom loads" will run your batteries flat! Best bet is to identify which 12 volt fuses protect these units and remove them. It is a real good idea to check at the battery with an ammeter to ensure that there is no current drain.
Provide for some sort of charging to offset the batteries tendency to self-discharge. This can be provided by a small solar panel or trickle charger, or the converter or 3 stage charger in your RV. It is best to let the batteries discharge slightly over a few weeks or a month and then do a full recharge overnight. Trickle chargers and unregulated solar panels can slowly boil off electrolyte, or worse, fail to maintain the charge, allowing your batteries to become deeply discharged. If your RV has a standard converter, do not leave it plugged in constantly to keep your batteries up! That converter will boil your batteries DRY in a big hurry!
If a boat is plugged into A/C power over the storage period, make sure to either unplug the converter or switch it off at the breaker. It's far better to run the converter overnight every 3 or 4 weeks or so as needed to charge the batteries. Another possibility would be to put the converter or the whole boat on a simple plug in timer and set it to be "on" for about 1 hour a day. If you have a smart 3 stage charger, it may be safe to leave it plugged in at all times, but pay very close attention to the electrolyte level in the batteries just in case. Boiling a battery down to where the plates are exposed to air will cause permanent damage to the battery. Don't let this happen to you!
Check on the batteries from time to time during the storage period. Stop by at least once a month and check battery voltage and electrolyte levels. Don't walk away from the batteries in November and expect them to still be ready to go in May.
The bottom line....
Pay attention to safety when working with or near batteries.
Buy only good quality Deep Cycle batteries for your boat.
Keep up with battery maintenance... check electrolyte levels regularly and pay attention to charging and discharging protocols to increase lifespan.
Invest in a good digital voltmeter and use it.
Consider replacing an old converter for a better quality 3 stage charger.
Take care of batteries during extended storage periods.

Friday, 29 March 2013

Mainsheet, Traveller, and Traveller Car
Mainsheet, Traveller, and Traveller Car
The mainsail needs to be controlled from the mast and the boom. Here are the basic controls used most often by the sailing crew.
Mainsheet
You need a way to control the sailboat boom. The mainsheet consists of blocks--or pulleys--that attach to the end or middle of the boom and deck. You ease (let out) the mainsheet to allow the boom to swing away from the boat. You trim or sheet (pull in) the boom with the mainsheet to bring the boom closer to the boat.
Traveller
A flat, thin bar, installed athwartships (side to side), upon which the traveller car slides. The traveller helps to adjust the position of the boom.
Traveller Car
The bottom block on most mainsheets attaches to a device called a mainsheet car. The mainsheet car slides along the traveler to allow more control on the mainsail.
Genoa Sheet, Lead Block, and Sheet Winch
The headsail - which may be a jib or Genoa - needs line and winches to keep control and make adjustments to shape the headsail for maximum performance.
Genoa Sheet
Each headsail has two control lines called sheets that attach to the clew of the sail.
Lead Block
After you attach the headsail sheet, lead each sheet along the side of the boat. Thread it through the lead block. This block sits atop a Genoa track, and directs (leads) the line back to the cockpit sheet winch.
Sheet Winch
Each sheet leads from the sheet block back to a sheet winch on each side of the boat. Because the loads on a jib or Genoa filled with wind are so high, you need the power of a winch to provide many times more mechanical advantage to pull in (grind) on each Genoa sheet. Make sure that you take three or more clockwise wraps on the winch before you start to grind the winch.
Other Control Devices
Some controls are common to both sails, such as halyards, halyard winches, and winch handles.
Halyards
You hoist each sail with the halyard. The end of each halyard has a shackle that attaches to the head of the sail. Haul (raise) each sail all the way to the top of the mast before you tie it off (cleat it).
Halyard Winch
Similar to the sheet winch, each sail halyard has its own winch so that you can place enough tension along the luff to shape the sail. Make sure that you take three or more clockwise wraps on the winch before you start to grind the winch.
Winch Handle
Each winch handle has a ratchet shaped end that fits into the center of the winch drum. The handle should be long enough to enable you to grind on the winch without excessive effort. Stow the winch handle in a winch handle pocket, or keep it in the cockpit to prevent loss.
Boom Vang
When the end of the boom goes out past the side of the boat, the mainsheet will not have enough "umph" to pull down on the leech of the mainsail. That's where the boom vang takes over. It's a simple block and tackle--much like the mainsheet--but it attaches to the bottom of the mast and then to the underside of the sailboat boom.
Article Source: http://EzineArticles.com/6370820
A boom vang is used on a sailboat to pull down the boom on off-wind points of sail when the wind in the mainsail would lift the boom. Proper use of a boom vang helps keep the sail full and drawing well.
What a Boom Vang Does
When a sailboat sails downwind, the mainsail is let out for best sail trim, and the boom is typically 50 to 80 degrees from the centreline out to the leeward side. Because of this angle, the mainsheet has little downward pull on the boom, which freely rises and falls with wind changes and when the boat rolls on waves from behind. When the boom rises, the mainsail billows out, twists, and spills wind, then may snap back - over and over. This motion makes the sail less efficient.
A boom vang prevents this motion by pulling downward on the boom regardless of its position in relation to the centreline. A traditional block-and-tackle vang (photo) mounts between the base of the mast and mid-boom. The control line is typically led back to the cockpit, where pulling the line exerts force to pull the boom down.
A number of commercial rigid boom vangs are also available. This is essentially an adjustable pole that mounts similarly to hold down the boom. While more expensive than a block-and-tackle vang, rigid vangs have the added function of also holding the boom up when the mainsail is lowered, such that a topping lift is not needed.
How to Use a Boom Vang
When to tighten the vang:
When sailing downwind on a broad reach or a run, tighten the vang to keep the boom down and minimize mainsail twist that spills air from the sail.
If the boat does not have a traveller, which is used to pull the boom down on a beam reach, use the vang even on a beam reach (the wind directly over one side).
When to ease or release the vang to allow the boom to rise:
When sailing downwind in light air, the mainsail generally has better shape if the vang is not tight. Let the sail bag out some.
When sailing downwind in a strong wind, ease the vang to de-power the mainsail by allowing the boom to rise and the sail to spill air high up (mainsail “twist”). Bring in the mainsheet if needed to prevent chafing of the sail against the shrouds and spreaders.
After dropping the mainsail, raise the boom to give more headroom in the cockpit.
Boom Vang as Preventer
If your boat lacks a boom preventer, an important piece of safety gear, it may be possible to improvise with the vang as a preventer when needed, if its lower connection can be easily released and moved forward of the mast. See How to Rig a Preventer.
The mainsail needs to be controlled from the mast and the boom. Here are the basic controls used most often by the sailing crew.
Mainsheet
You need a way to control the sailboat boom. The mainsheet consists of blocks--or pulleys--that attach to the end or middle of the boom and deck. You ease (let out) the mainsheet to allow the boom to swing away from the boat. You trim or sheet (pull in) the boom with the mainsheet to bring the boom closer to the boat.
Traveller
A flat, thin bar, installed athwartships (side to side), upon which the traveller car slides. The traveller helps to adjust the position of the boom.
Traveller Car
The bottom block on most mainsheets attaches to a device called a mainsheet car. The mainsheet car slides along the traveler to allow more control on the mainsail.
Genoa Sheet, Lead Block, and Sheet Winch
The headsail - which may be a jib or Genoa - needs line and winches to keep control and make adjustments to shape the headsail for maximum performance.
Genoa Sheet
Each headsail has two control lines called sheets that attach to the clew of the sail.
Lead Block
After you attach the headsail sheet, lead each sheet along the side of the boat. Thread it through the lead block. This block sits atop a Genoa track, and directs (leads) the line back to the cockpit sheet winch.
Sheet Winch
Each sheet leads from the sheet block back to a sheet winch on each side of the boat. Because the loads on a jib or Genoa filled with wind are so high, you need the power of a winch to provide many times more mechanical advantage to pull in (grind) on each Genoa sheet. Make sure that you take three or more clockwise wraps on the winch before you start to grind the winch.
Other Control Devices
Some controls are common to both sails, such as halyards, halyard winches, and winch handles.
Halyards
You hoist each sail with the halyard. The end of each halyard has a shackle that attaches to the head of the sail. Haul (raise) each sail all the way to the top of the mast before you tie it off (cleat it).
Halyard Winch
Similar to the sheet winch, each sail halyard has its own winch so that you can place enough tension along the luff to shape the sail. Make sure that you take three or more clockwise wraps on the winch before you start to grind the winch.
Winch Handle
Each winch handle has a ratchet shaped end that fits into the center of the winch drum. The handle should be long enough to enable you to grind on the winch without excessive effort. Stow the winch handle in a winch handle pocket, or keep it in the cockpit to prevent loss.
Boom Vang
When the end of the boom goes out past the side of the boat, the mainsheet will not have enough "umph" to pull down on the leech of the mainsail. That's where the boom vang takes over. It's a simple block and tackle--much like the mainsheet--but it attaches to the bottom of the mast and then to the underside of the sailboat boom.
Article Source: http://EzineArticles.com/6370820
A boom vang is used on a sailboat to pull down the boom on off-wind points of sail when the wind in the mainsail would lift the boom. Proper use of a boom vang helps keep the sail full and drawing well.
What a Boom Vang Does
When a sailboat sails downwind, the mainsail is let out for best sail trim, and the boom is typically 50 to 80 degrees from the centreline out to the leeward side. Because of this angle, the mainsheet has little downward pull on the boom, which freely rises and falls with wind changes and when the boat rolls on waves from behind. When the boom rises, the mainsail billows out, twists, and spills wind, then may snap back - over and over. This motion makes the sail less efficient.
A boom vang prevents this motion by pulling downward on the boom regardless of its position in relation to the centreline. A traditional block-and-tackle vang (photo) mounts between the base of the mast and mid-boom. The control line is typically led back to the cockpit, where pulling the line exerts force to pull the boom down.
A number of commercial rigid boom vangs are also available. This is essentially an adjustable pole that mounts similarly to hold down the boom. While more expensive than a block-and-tackle vang, rigid vangs have the added function of also holding the boom up when the mainsail is lowered, such that a topping lift is not needed.
How to Use a Boom Vang
When to tighten the vang:
When sailing downwind on a broad reach or a run, tighten the vang to keep the boom down and minimize mainsail twist that spills air from the sail.
If the boat does not have a traveller, which is used to pull the boom down on a beam reach, use the vang even on a beam reach (the wind directly over one side).
When to ease or release the vang to allow the boom to rise:
When sailing downwind in light air, the mainsail generally has better shape if the vang is not tight. Let the sail bag out some.
When sailing downwind in a strong wind, ease the vang to de-power the mainsail by allowing the boom to rise and the sail to spill air high up (mainsail “twist”). Bring in the mainsheet if needed to prevent chafing of the sail against the shrouds and spreaders.
After dropping the mainsail, raise the boom to give more headroom in the cockpit.
Boom Vang as Preventer
If your boat lacks a boom preventer, an important piece of safety gear, it may be possible to improvise with the vang as a preventer when needed, if its lower connection can be easily released and moved forward of the mast. See How to Rig a Preventer.
The Beaufort Scale
Beaufort Scale
 Beaufort’s diary from 1806, showing his original scale.
It is often said that Francis Beaufort, of the British Royal Navy, was the first to devise a scale of wind force – towards the start of the 19th century. However, in reality he was not, in fact, the originator of such a scale. A similar one was actually in use at least a century earlier – and probably long before that.
We do not know who first devised a scale of wind force. But it would be surprising if medieval Arab seafarers did not use one because they had, by the late 15th century, classified in detail virtually every aspect of the weather that had any navigational significance. It would be surprising, too, if the mariners of ancient times did not use such a scale – but as they left so few records, we can only speculate.
The scale we all know – the one that bears Beaufort’s name – was formulated at the start of the 19th century. But accounts from 1704 show that a similar scale was in use a century earlier.


The scale is used in the Shipping Forecasts broadcast on BBC Radio 4 in the United Kingdom, and in the Sea Area Forecast from Met Éireann, the Irish Meteorological Service. Met Éireann issues a "Small Craft Warning" if winds of Beaufort Force 6 (min. mean of 22 knots) are expected up to 10 Nautical miles offshore. Other warnings are issued by Met Éireann for Irish coastal waters, which are regarded as extending 30 miles out from the coastline, and the Irish Sea or part thereof: "Gale Warnings" are issued if winds of Beaufort Force 8 are expected; "Strong Gale Warnings" are issued if winds of Beaufort Force 9 or frequent gusts of at least 52 knots are expected.; "Storm Force Warnings" are issued if Beaufort Force 10 or frequent gusts of at least 61 knots are expected; "Violent Storm Force Warnings" are issued if Beaufort Force 11 or frequent gusts of at least 69 knots are expected; "Hurricane Force Warnings" are issued if winds of greater than 64 knots are expected.
 Beaufort’s diary from 1806, showing his original scale.
It is often said that Francis Beaufort, of the British Royal Navy, was the first to devise a scale of wind force – towards the start of the 19th century. However, in reality he was not, in fact, the originator of such a scale. A similar one was actually in use at least a century earlier – and probably long before that.
We do not know who first devised a scale of wind force. But it would be surprising if medieval Arab seafarers did not use one because they had, by the late 15th century, classified in detail virtually every aspect of the weather that had any navigational significance. It would be surprising, too, if the mariners of ancient times did not use such a scale – but as they left so few records, we can only speculate.
The scale we all know – the one that bears Beaufort’s name – was formulated at the start of the 19th century. But accounts from 1704 show that a similar scale was in use a century earlier.


The scale is used in the Shipping Forecasts broadcast on BBC Radio 4 in the United Kingdom, and in the Sea Area Forecast from Met Éireann, the Irish Meteorological Service. Met Éireann issues a "Small Craft Warning" if winds of Beaufort Force 6 (min. mean of 22 knots) are expected up to 10 Nautical miles offshore. Other warnings are issued by Met Éireann for Irish coastal waters, which are regarded as extending 30 miles out from the coastline, and the Irish Sea or part thereof: "Gale Warnings" are issued if winds of Beaufort Force 8 are expected; "Strong Gale Warnings" are issued if winds of Beaufort Force 9 or frequent gusts of at least 52 knots are expected.; "Storm Force Warnings" are issued if Beaufort Force 10 or frequent gusts of at least 61 knots are expected; "Violent Storm Force Warnings" are issued if Beaufort Force 11 or frequent gusts of at least 69 knots are expected; "Hurricane Force Warnings" are issued if winds of greater than 64 knots are expected.
Weather Forecasting
Weather Forecasting
BBC Weather
http://www.bbc.co.uk/weather/2641108
BBC British Isles Weather Forecast Video
http://news.bbc.co.uk/weather/hi/news/newsid_7725000/7725418.stm
Metcheck
http://www.metcheck.com/V40/UK/HOME
Metcheck Atlantic Jet Stream
http://www.metcheck.com/V40/UK/FREE/jetstream.asp
MetBrief Marine
http://www.wetterzentrale.de/wz/pics/brack5.gif
UK Inshore Waters Forecast & Strong Winds
http://www.metoffice.gov.uk/weather/marine/inshore_forecast.html#All
Met Office Marine Forecasts - Strathclyde
http://www.metoffice.gov.uk/weather/uk/st/st_forecast_warnings.html
Met Office Inshore Waters Forecast and Strong Winds
http://www.metoffice.gov.uk/weather/marine/inshore_forecast.html#All
XC Weather
http://www.xcweather.co.uk/
Wind Finder Britain
http://www.windfinder.com/windreports/windkarte_gb.htm
British Isles Satellite view of Weather
http://www.metoffice.gov.uk/satpics/latest_uk_vis.html
UK Synoptic Charts
http://www.metoffice.gov.uk/weather/uk/surface_pressure.html
High Sea Forecast & Storm Warnings
http://www.metoffice.gov.uk/weather/marine/highseas_forecast.html#All~All
Frank Singleton's Weather Information
http://weather.mailasail.com/Franks-Weather/Home
Wind Guru
http://www.windfinder.com/windreports/windkarte_gb.htm
Met Office Oban - http://www.metoffice.gov.uk/weather/uk/st/oban_forecast_weather.html?select=st/oban
with the relevant sea areas:
Met Office inshore waters forecast from the Mull of Kintyre to Ardnamurchan Point
- http://www.metoffice.gov.uk/weather/marine/inshore_forecast.html#MullofKintyretoArdnamurchanPoint
Met office inshore waters forecast from Ardnamurchan Point to Cape Wrath excluding the Minch
- http://www.metoffice.gov.uk/weather/marine/inshore_forecast.html#ArdnamurchanPointtoCapeWrath
Met Office inshore waters forecast for the Minch
- http://www.metoffice.gov.uk/weather/marine/inshore_forecast.html#TheMinch
xcweather - http://www.xcweather.co.uk/
BBC Weather
http://www.bbc.co.uk/weather/2641108
BBC British Isles Weather Forecast Video
http://news.bbc.co.uk/weather/hi/news/newsid_7725000/7725418.stm
Metcheck
http://www.metcheck.com/V40/UK/HOME
Metcheck Atlantic Jet Stream
http://www.metcheck.com/V40/UK/FREE/jetstream.asp
MetBrief Marine
http://www.wetterzentrale.de/wz/pics/brack5.gif
UK Inshore Waters Forecast & Strong Winds
http://www.metoffice.gov.uk/weather/marine/inshore_forecast.html#All
Met Office Marine Forecasts - Strathclyde
http://www.metoffice.gov.uk/weather/uk/st/st_forecast_warnings.html
Met Office Inshore Waters Forecast and Strong Winds
http://www.metoffice.gov.uk/weather/marine/inshore_forecast.html#All
XC Weather
http://www.xcweather.co.uk/
Wind Finder Britain
http://www.windfinder.com/windreports/windkarte_gb.htm
British Isles Satellite view of Weather
http://www.metoffice.gov.uk/satpics/latest_uk_vis.html
UK Synoptic Charts
http://www.metoffice.gov.uk/weather/uk/surface_pressure.html
High Sea Forecast & Storm Warnings
http://www.metoffice.gov.uk/weather/marine/highseas_forecast.html#All~All
Frank Singleton's Weather Information
http://weather.mailasail.com/Franks-Weather/Home
Wind Guru
http://www.windfinder.com/windreports/windkarte_gb.htm
Met Office Oban - http://www.metoffice.gov.uk/weather/uk/st/oban_forecast_weather.html?select=st/oban
with the relevant sea areas:
Met Office inshore waters forecast from the Mull of Kintyre to Ardnamurchan Point
- http://www.metoffice.gov.uk/weather/marine/inshore_forecast.html#MullofKintyretoArdnamurchanPoint
Met office inshore waters forecast from Ardnamurchan Point to Cape Wrath excluding the Minch
- http://www.metoffice.gov.uk/weather/marine/inshore_forecast.html#ArdnamurchanPointtoCapeWrath
Met Office inshore waters forecast for the Minch
- http://www.metoffice.gov.uk/weather/marine/inshore_forecast.html#TheMinch
xcweather - http://www.xcweather.co.uk/
Anchoring
Anchoring generally
Jeremy Rogers Ltd now supplies any new Contessa with a 25lb CQR anchor with 10 metres galvanised 8mm chain and 30 metres nylon warp.
Cryptic has 30 metres of 8 mm chain and 17 metres of warp securing a 25 Ib CQR anchor.
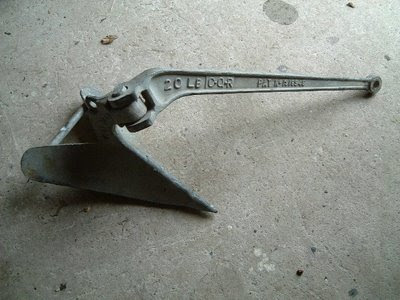
CQR - nearest sounds to "secure" or Plough anchor. So named due to its resemblance to a traditional agricultural plough - the original CQR (Secure), a 1933 design patented in the UK by a mathematician - Geoffrey Ingram Taylor - they are generally good in all bottoms, but not exceptional in any. The CQR design has a hinged shank, allowing the anchor to turn with direction changes rather than breaking out.
In Cryptic's stern locker she has approx 10 lb Danforth type.
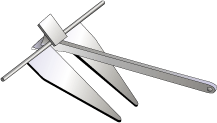
American Richard Danforth invented the Danforth pattern in the 1940s for use aboard landing craft. It uses a stock at the crown to which two large flat triangular flukes are attached. The stock is hinged so the flukes can orient toward the bottom. Tripping palms at the crown act to tip the flukes into the seabed. The design is a burying variety, and once well set can develop high resistance. Its light weight and compact flat design make it easy to retrieve and relatively easy to store but has difficulty penetrating kelp and weed-covered bottoms, as well as rocky and particularly hard sand or clay bottoms. If there is much current or the vessel is moving while dropping the anchor it may "kite" or "skate" over the bottom due to the large fluke area acting as a sail or wing. Once set, the anchor tends to break out and reset when the direction of force changes dramatically, such as with the changing tide, and on some occasions it might not reset but instead drag.
The basic anchoring consists of determining the location, dropping the anchor, laying out the scope, setting the hook, and assessing where the vessel ends up. The ship will seek a location which is sufficiently protected; has suitable holding ground, enough depth at low tide and enough room for the boat to swing.
The location to drop the anchor should be approached from down wind or down current, whichever is stronger. As the chosen spot is approached, the vessel should be stopped or even beginning to drift back. The anchor should be lowered quickly but under control until it is on the bottom. The vessel should continue to drift back, and the cable should be veered out under control so it will be relatively straight.
Once the desired scope is laid out, the vessel should be gently forced astern, usually using the auxiliary motor but possibly by backing a sail. A hand on the anchor line may telegraph a series of jerks and jolts, indicating the anchor is dragging, or a smooth tension indicative of digging in. As the anchor begins to dig in and resist backward force, the engine may be throttled up to get a thorough set. If the anchor continues to drag, or sets after having dragged too far, it should be retrieved and moved back to the desired position (or another location chosen.)
There are techniques of anchoring to limit the swing of a vessel.
- If the anchorage has limited room by using an anchor weight, kellet or sentinel. One lowers a concentrated, heavy weight down the anchor line – rope or chain – directly in front of the bow to the seabed, behaves like a heavy chain rode and lowers the angle of pull on the anchor. If the weight is suspended off the seabed it acts as a spring or shock absorber to dampen the sudden actions that are normally transmitted to the anchor and can cause it to dislodge and drag. In light conditions, a kellet will reduce the swing of the vessel considerably. In heavier conditions these effects disappear as the rode becomes straightened and the weight ineffective. Known as a "anchor chum weight" or "angel" in the UK.
- Using two anchors set approximately 45° apart, or wider angles up to 90°, from the bow is a strong mooring for facing into strong winds. To set anchors in this way, first one anchor is set in the normal fashion. Then, taking in on the first cable as the boat is motored into the wind and letting slack while drifting back, a second anchor is set approximately a half-scope away from the first on a line perpendicular to the wind. After this second anchor is set, the scope on the first is taken up until the vessel is lying between the two anchors and the load is taken equally on each cable. This moor also to some degree limits the range of a vessel's swing to a narrower oval. Care should be taken that other vessels will not swing down on the boat due to the limited swing range.
Anchoring in West Scotland especially
People worry about anchoring (and so they should), particularly if they are from the marina-strewn south of England, and even sometimes from the Clyde. Do not think you can get away with marinas and moorings in this area - you definitely cannot, and indeed should not if you want to make the best of it.
Don't worry too much if you seem to be close to the shore, or indeed a rock that emerges at low water. You do have to be closer in here than on the south and east coasts of England. Just make sure you have not got too much chain out so that if the wind or tide change you don't go aground.
Need a good heavy anchor appropriate to your boat size along with 30 metres of chain. I have always used a CQR with no problem, others swear by the ROCNA.
Lay out the chain to 3-4 times the depth at high water, and then motor back on the anchor hard to ensure it is well dug in - this is particularly important in places like Canna harbour which is notorious for kelp.
Never use a tripping line for fear it will trip itself, or wrap itself round the prop, and so far so good. Put out a second anchor if it is going to blow hard. It is also easier to lay out even more chain if there is room to swing.
Jeremy Rogers Ltd now supplies any new Contessa with a 25lb CQR anchor with 10 metres galvanised 8mm chain and 30 metres nylon warp.
Cryptic has 30 metres of 8 mm chain and 17 metres of warp securing a 25 Ib CQR anchor.

CQR - nearest sounds to "secure" or Plough anchor. So named due to its resemblance to a traditional agricultural plough - the original CQR (Secure), a 1933 design patented in the UK by a mathematician - Geoffrey Ingram Taylor - they are generally good in all bottoms, but not exceptional in any. The CQR design has a hinged shank, allowing the anchor to turn with direction changes rather than breaking out.
In Cryptic's stern locker she has approx 10 lb Danforth type.

American Richard Danforth invented the Danforth pattern in the 1940s for use aboard landing craft. It uses a stock at the crown to which two large flat triangular flukes are attached. The stock is hinged so the flukes can orient toward the bottom. Tripping palms at the crown act to tip the flukes into the seabed. The design is a burying variety, and once well set can develop high resistance. Its light weight and compact flat design make it easy to retrieve and relatively easy to store but has difficulty penetrating kelp and weed-covered bottoms, as well as rocky and particularly hard sand or clay bottoms. If there is much current or the vessel is moving while dropping the anchor it may "kite" or "skate" over the bottom due to the large fluke area acting as a sail or wing. Once set, the anchor tends to break out and reset when the direction of force changes dramatically, such as with the changing tide, and on some occasions it might not reset but instead drag.
The basic anchoring consists of determining the location, dropping the anchor, laying out the scope, setting the hook, and assessing where the vessel ends up. The ship will seek a location which is sufficiently protected; has suitable holding ground, enough depth at low tide and enough room for the boat to swing.
The location to drop the anchor should be approached from down wind or down current, whichever is stronger. As the chosen spot is approached, the vessel should be stopped or even beginning to drift back. The anchor should be lowered quickly but under control until it is on the bottom. The vessel should continue to drift back, and the cable should be veered out under control so it will be relatively straight.
Once the desired scope is laid out, the vessel should be gently forced astern, usually using the auxiliary motor but possibly by backing a sail. A hand on the anchor line may telegraph a series of jerks and jolts, indicating the anchor is dragging, or a smooth tension indicative of digging in. As the anchor begins to dig in and resist backward force, the engine may be throttled up to get a thorough set. If the anchor continues to drag, or sets after having dragged too far, it should be retrieved and moved back to the desired position (or another location chosen.)
There are techniques of anchoring to limit the swing of a vessel.
- If the anchorage has limited room by using an anchor weight, kellet or sentinel. One lowers a concentrated, heavy weight down the anchor line – rope or chain – directly in front of the bow to the seabed, behaves like a heavy chain rode and lowers the angle of pull on the anchor. If the weight is suspended off the seabed it acts as a spring or shock absorber to dampen the sudden actions that are normally transmitted to the anchor and can cause it to dislodge and drag. In light conditions, a kellet will reduce the swing of the vessel considerably. In heavier conditions these effects disappear as the rode becomes straightened and the weight ineffective. Known as a "anchor chum weight" or "angel" in the UK.
- Using two anchors set approximately 45° apart, or wider angles up to 90°, from the bow is a strong mooring for facing into strong winds. To set anchors in this way, first one anchor is set in the normal fashion. Then, taking in on the first cable as the boat is motored into the wind and letting slack while drifting back, a second anchor is set approximately a half-scope away from the first on a line perpendicular to the wind. After this second anchor is set, the scope on the first is taken up until the vessel is lying between the two anchors and the load is taken equally on each cable. This moor also to some degree limits the range of a vessel's swing to a narrower oval. Care should be taken that other vessels will not swing down on the boat due to the limited swing range.
Anchoring in West Scotland especially
People worry about anchoring (and so they should), particularly if they are from the marina-strewn south of England, and even sometimes from the Clyde. Do not think you can get away with marinas and moorings in this area - you definitely cannot, and indeed should not if you want to make the best of it.
Don't worry too much if you seem to be close to the shore, or indeed a rock that emerges at low water. You do have to be closer in here than on the south and east coasts of England. Just make sure you have not got too much chain out so that if the wind or tide change you don't go aground.
Need a good heavy anchor appropriate to your boat size along with 30 metres of chain. I have always used a CQR with no problem, others swear by the ROCNA.
Lay out the chain to 3-4 times the depth at high water, and then motor back on the anchor hard to ensure it is well dug in - this is particularly important in places like Canna harbour which is notorious for kelp.
Never use a tripping line for fear it will trip itself, or wrap itself round the prop, and so far so good. Put out a second anchor if it is going to blow hard. It is also easier to lay out even more chain if there is room to swing.
New Tender & Outboard ordered ...
TENDER
The Bombard Typhoon tender range, made from glued "STRONGAN" fabric, has a compact size when packed away - folded in bag dimensions 2'11" x 1'6" x 0'9" in the case of the 200. Overall length 6'7" Beam 4'1" Tube diameter 13" 2 airtight compartments
2 person capacity Maximum payload 165kg (!) Maximum outboard 3hp Short shaft engine installation Maximum engine weight 15kg
Slatted floor + Aluminium engine mounting plate + Bailer / 1100 Decitex fabric
Semi-recessed valve Bravo type (one way!) / Lashing / Flared anti-chafing fender
1 Bow handle / 2 "D" rings for towing / 2 Swivel oarlocks + 2 Aluminium oars / Cone reinforcement (all with a carrying bag) as well as a Footpump + 1 Repair kit and an Owners manual!

ENGINE
Model - Suzuki DF2.5S
Shaft Length - 381 mm
Weight - 13.0 Kg
Bore x Stroke - 48mm x 38mm
Propeller Selection (pitch) - 5.3'' - 8"
Starting System - Manual
Engine Type - OHV
Fuel Delivery System - Carburetor
No. Of Cylinders - 1
Piston Displacement - 68cc
Maximum Output - 1.8 kW
Full Throttle Operating Range - 5,250 - 6,750 r.p.m.
Steering - Tiller
Oil Pan Capacity - 0.3 L
Ignition System - P.E.I Alternator
Engine Mounting - Bushing Type
Trim Method - Manual and Tilt
Gear Ratio - 2.15:1
Gear Shift F-N
Exhaust - above propeller exhaust

Weighing only 13kg, the DF2.5 is the lightest 2.5hp four stroke on the market. Yet it still produces very little noise and engine vibration and there are a range of features not expected on such a small outboard, including Forward-Neutral Gear shift, water-cooling and a 1 litre fuel tank that will last for hours.
The Bombard Typhoon tender range, made from glued "STRONGAN" fabric, has a compact size when packed away - folded in bag dimensions 2'11" x 1'6" x 0'9" in the case of the 200. Overall length 6'7" Beam 4'1" Tube diameter 13" 2 airtight compartments
2 person capacity Maximum payload 165kg (!) Maximum outboard 3hp Short shaft engine installation Maximum engine weight 15kg
Slatted floor + Aluminium engine mounting plate + Bailer / 1100 Decitex fabric
Semi-recessed valve Bravo type (one way!) / Lashing / Flared anti-chafing fender
1 Bow handle / 2 "D" rings for towing / 2 Swivel oarlocks + 2 Aluminium oars / Cone reinforcement (all with a carrying bag) as well as a Footpump + 1 Repair kit and an Owners manual!

ENGINE
Model - Suzuki DF2.5S
Shaft Length - 381 mm
Weight - 13.0 Kg
Bore x Stroke - 48mm x 38mm
Propeller Selection (pitch) - 5.3'' - 8"
Starting System - Manual
Engine Type - OHV
Fuel Delivery System - Carburetor
No. Of Cylinders - 1
Piston Displacement - 68cc
Maximum Output - 1.8 kW
Full Throttle Operating Range - 5,250 - 6,750 r.p.m.
Steering - Tiller
Oil Pan Capacity - 0.3 L
Ignition System - P.E.I Alternator
Engine Mounting - Bushing Type
Trim Method - Manual and Tilt
Gear Ratio - 2.15:1
Gear Shift F-N
Exhaust - above propeller exhaust

Weighing only 13kg, the DF2.5 is the lightest 2.5hp four stroke on the market. Yet it still produces very little noise and engine vibration and there are a range of features not expected on such a small outboard, including Forward-Neutral Gear shift, water-cooling and a 1 litre fuel tank that will last for hours.
Starting & Stopping the engine
Starting & Stopping the engine
Beta 20 HP Number K15553.
Only has a Beta Control panel with a keyswitch.

When leaving boat for an extended period turn off sea cock (in cupboard under the sink) and turn off the isolate battery switch.
When starting boat engine ...
- Turn sea cock on (in line with pipe)
- Turn on battery isolator switch
- Ensure engine is OUT of GEAR but throttle about one third open
- Turn key for 10 seconds or so maximum to HEAT position (15 seconds and longer will damage starter plugs and lead to poor starting later).
- Turn clockwise to START to start!
Panel should illuminate!
Green lamp for panel power should come on
Buzzer should sound
Red lamp should light for low oil pressure
Red lamp for high engine temperature should NOT come on
Red lamp for no starter battery charge should come on
- Leave key in RUN position by releasing from START
All re lamp warning lights should go off
Buzzer should stop
Note: Oil pressure warning may take some time to go out
Battery charge may not go out on tick-over - only if revs are higher (2,000 rpm).
Stopping the engine
Normally use STOP button - Hold until engine stops ... should be in a few seconds ...
Alternately there is a lever on the engine if the steps are lifted out. This lever is held towards the stern and stops the engine.
Never switch the key to OFF when the engine is running as the alternator will not charge the battery.
Beta 20 HP Number K15553.
Only has a Beta Control panel with a keyswitch.

When leaving boat for an extended period turn off sea cock (in cupboard under the sink) and turn off the isolate battery switch.
When starting boat engine ...
- Turn sea cock on (in line with pipe)
- Turn on battery isolator switch
- Ensure engine is OUT of GEAR but throttle about one third open
- Turn key for 10 seconds or so maximum to HEAT position (15 seconds and longer will damage starter plugs and lead to poor starting later).
- Turn clockwise to START to start!
Panel should illuminate!
Green lamp for panel power should come on
Buzzer should sound
Red lamp should light for low oil pressure
Red lamp for high engine temperature should NOT come on
Red lamp for no starter battery charge should come on
- Leave key in RUN position by releasing from START
All re lamp warning lights should go off
Buzzer should stop
Note: Oil pressure warning may take some time to go out
Battery charge may not go out on tick-over - only if revs are higher (2,000 rpm).
Stopping the engine
Normally use STOP button - Hold until engine stops ... should be in a few seconds ...
Alternately there is a lever on the engine if the steps are lifted out. This lever is held towards the stern and stops the engine.
Never switch the key to OFF when the engine is running as the alternator will not charge the battery.
Subscribe to:
Posts (Atom)